1
2
3
4
5
6
7
8
9
10
11
12
13
14
15
16
17
18
19
20
21
22
23
24
25
26
27
28
29
30
31
32
33
34
35
36
37
38
39
40
41
42
43
44
45
46
47
48
49
50
51
52
53
54
55
56
57
58
59
60
61
62
63
64
65
66
67
68
69
70
71
72
73
74
75
76
77
78
79
80
81
82
83
84
85
86
87
88
89
90
91
92
93
94
95
96
97
98
99
100
101
102
103
104
105
106
107
108
109
110
111
112
113
114
115
116
117
118
119
120
121
122
123
124
125
|
//imadjust函数的实现
#include<opencv2/opencv.hpp>
#include<iostream>
#include<cassert>
#include<vector>
void imadjust(cv::Mat& input, cv::Mat& output, double low_in = 0.0, double high_in  = 1.0, double low_out = 0.0, double high_out = 1.0, double gamma = 1);//matlab,像素区间[0,1]
void imadjust(cv::Mat& input, cv::Mat& output, std::vector<double> in = { 0.0, 1.0 }, double low_out = 0.0, double high_out = 1.0, double gamma = 1);
void imadjust2(cv::Mat& input, cv::Mat& output, int low_in, int high_in, int low_out, int high_out, double gamma = 1);//opencv,像素区间[0,255]
std::vector<uchar> gammaLut(const double gamma, const double c = 1.0);//灰度值的伽马变换结果表lut
bool is0to1(const double var);
int main()
{
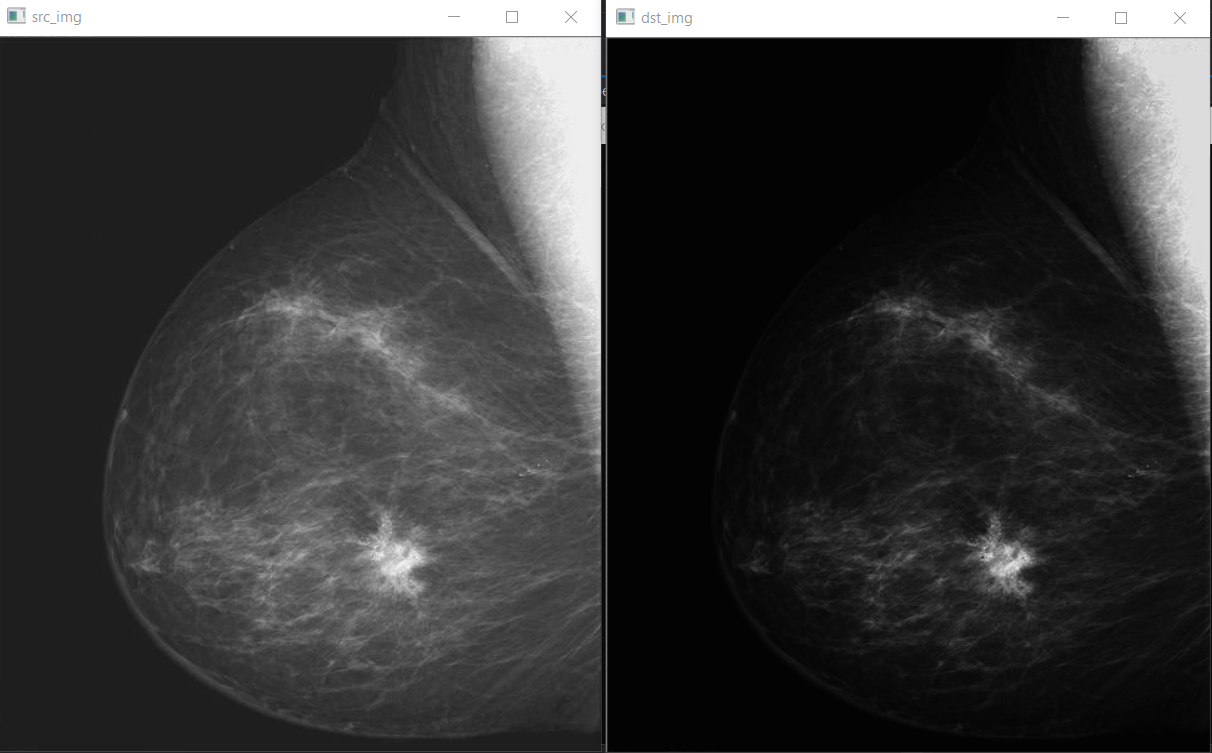
cv::Mat src_img = cv::imread("Fig0304(a)(breast_digital_Xray).tif");
if(src_img.empty()) return -1;
cv::Mat dst_img;
imadjust(src_img, dst_img, 0, 1, 0, 1, 2);
cv::imshow("src_img", src_img);
cv::imshow("dst_img", dst_img);
cv::waitKey(0);
return 0;
}//main
void imadjust(cv::Mat& input, cv::Mat& output, double low_in, double high_in, double low_out, double high_out, double gamma)
{
assert(low_in < high_in && is0to1(low_in) && is0to1(high_in) && is0to1(low_out) && is0to1(high_out));
//将matlab中的灰度值区间[0,1]转为opencv灰度值区间[0,255]
high_in *= 255; high_out *= 255; low_in *= 255; low_out *= 255;
imadjust2(input, output, low_in, high_in, low_out, high_out, gamma);
}
void imadjust(cv::Mat& input, cv::Mat& output, std::vector<double> in, double low_out, double high_out, double gamma)
{
assert(2 == in.size());
double low_in = in[0];
double high_in = in[1];
imadjust(input, output, low_in, high_in, low_out, high_out, gamma);
}
void imadjust2(cv::Mat& input, cv::Mat& output, int low_in, int high_in, int low_out, int high_out, double gamma )//opencv,像素区间[0,255]
{
output = input.clone();
int rows = input.rows;//行
int cols = input.cols;//列
double k = (static_cast<double>(high_out) - low_out) / (high_in - low_in);
std::vector<uchar> gamma_lut = gammaLut(gamma);
switch(input.channels())
{
case 1://灰度图
for (int i = 0; i < rows; ++i)
for (int j = 0; j < cols; ++j)
{
double result = 0;
if (input.at<uchar>(i, j) <= low_in)//灰度值小于low_in的像素点
{
result = low_out;//结果为low_out
}
else if (low_in < input.at<uchar>(i, j) && input.at<uchar>(i, j) < high_in)//灰度值在[low_in, high_in]
{
result = k * (input.at<uchar>(i, j) - low_in) + high_in;//灰度值线性变换
result = gamma_lut[static_cast<uchar>(result)];//灰度值gamma变换
}
else
{
result = high_out;//灰度值大于high_in的像素点,结果为high_out
}
output.at<uchar>(i, j) = static_cast<uchar>(result) % 255;
}
break;
//彩色图片
case 3:
for (int i = 0; i < rows; ++i)
for (int j = 0; j < cols; ++j)
for (int k = 0; k < 3; ++k)
{
double result = 0;
if (input.at<cv::Vec3b>(i, j)[k] <= low_in)
result = low_out;
else if (low_in < input.at<cv::Vec3b>(i, j)[k] && input.at<cv::Vec3b>(i, j)[k] < high_in)
{
result = k * (input.at<cv::Vec3b>(i, j)[k] - low_in) + high_in;
result = gamma_lut[static_cast<uchar>(result)];
}
else
{
result = high_out;
}
output.at<cv::Vec3b>(i, j)[k] = static_cast<uchar>(result) % 255;
}
break;
default:
break;
}
}
bool is0to1(const double var)
{
return 0 <= var && var <= 1;
}
std::vector<uchar> gammaLut(const double gamma, const double c)
{
	std::vector<uchar> lut(256);
	for (int i = 0; i < 256; ++i)
		lut[i] =  static_cast<uchar>(c * std::pow((double)(i / 255.0), gamma) * 255.0);

	return lut;
}
|
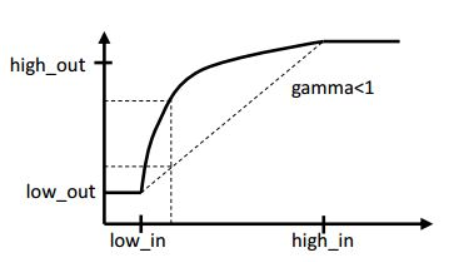
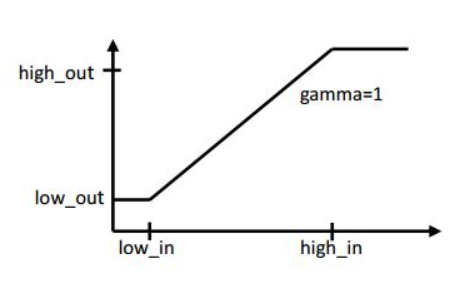
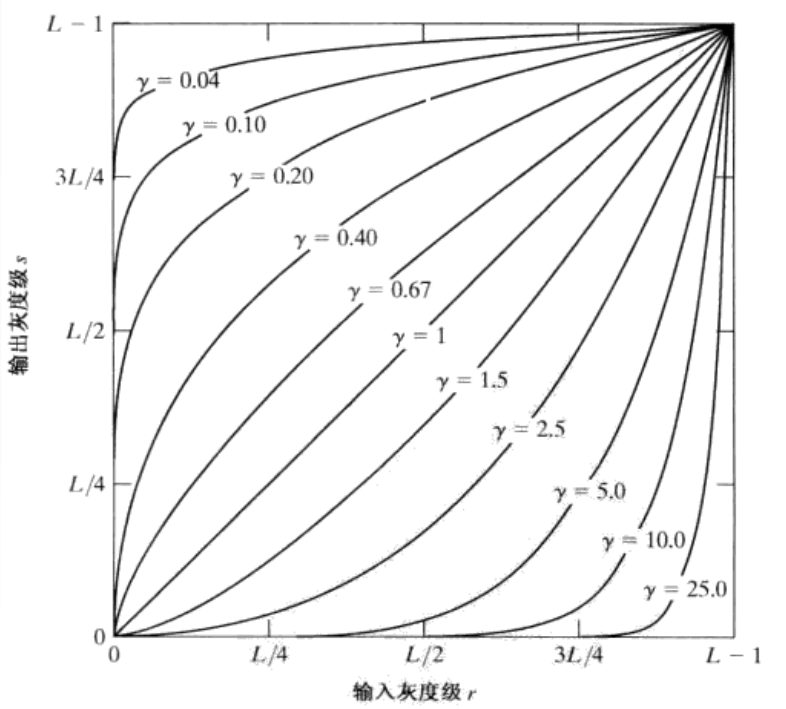
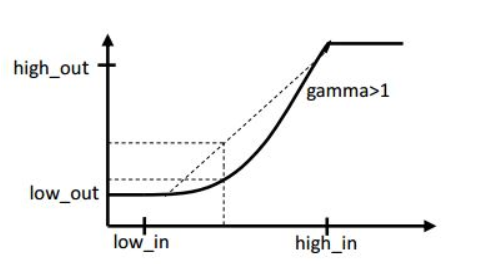 下面来讲一下伽马变换。伽马变换又称幂次变换,变换公式为