本站使用了 Pjax 等基于 JavaScript 的开发技术,但您的浏览器已禁用 JavaScript,请开启 JavaScript 以保证网站正常显示!

距离变换

目标

本篇的学习目标是弄明白以下几个问题

  1. 了解图像度量中的距离是什么,常见的距离有哪些。
  2. 认识本篇的主角-距离变换,弄明白何为距离变换。
  3. 了解距离变换算法有何作用以及在哪些方面有所应用。
  4. 学习距离变换算法的具体实现步骤,理解距离变换算法实现的细节。
  5. 使用c++基于opencv实现距离变换算法。

了解图像度量的距离

距离(distance)是描述图像两点像素之间的远近关系的度量,常见的度量距离有欧式距离(Euchildean distance)、城市街区距离(City block distance)、棋盘距离(Chessboard distance)

  • 欧式距离

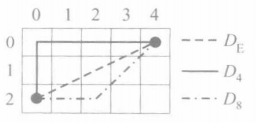
欧式距离的定义源于经典的几何学,与我们数学中所学的简单几何的两点之间的距离一致,为两个像素点坐标值得平方根。欧式距离的优点在于其定义非常地直观,是显而易见的,但缺点在于平方根的计算是非常耗时的,。

De = sqrt(((x2 - x1)*(x2 - x1) + (y2 - y1)*(y2 - y1)));
  • 城市街区距离

城市街区距离也称D4距离,此距离描述的是只允许像素坐标系平面中横向和纵向的移动距离。其定义为

D4 = abs(x1 - x2) + abs(y1 - y2);
  • 棋盘距离

如果允许在图像坐标系中像素点的对角线方向的移动,就可以得到棋盘距离,也称D8距离

D8 = max(abs(x1 - x2), (y1 - y2));

下图表示了三个距离之间的关系

距离度量.png

何为距离变换

距离变换(distance transfer)也称距离函数(distance function)或者斜切算法(chamfering algorithm),它是图像中距离概念的一个应用。距离变换得到的结果是像素点与图像中某个区域(或者边界)的距离,区域内部像素点距离变换结果为0,邻近的像素点变换结果为较小值,而离区域越远则数值越大。

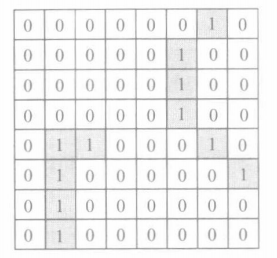
以下图为例说明,一幅二值图像像素值为0或1,令1表示物体区域,0表示背景。

原图.png
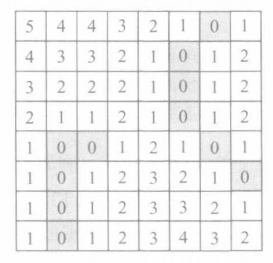
距离变换采用D4(城市街区距离),所得结果为
D4变换结果.png
可以看到,原本像素值为1的区域均变为0,因为它门到区域的距离为0,其他像素点随着距离越远数值越大。所以说,距离变换所得的结果就是像素点与目标区域的距离分布情况。

距离变换有何作用

距离变换有很多的应用,首先最直接的是在图像处理中作为其他图像处理算法的基础,如求取最近特征、骨架抽取。另外也在离散几何,移动机器人领域中的路径规划和障碍躲避也有其作用。

距离变换算法步骤

AL AL
AL P          mask1
AL
   BR
P  BR         mask2
BR BR

1.

将图像进行二值化,子图像值为0,背景为255;

2.

利用Mask 1从左向右,从上到下扫描,p点是当前像素点,q点是Mask 1中AL邻域中的点,D()为距离计算,包括棋盘距离、城市距离和欧式距离。F(p)为p点的像素值,计算

F(p) = min( F(p),  F(q)+D(p,q) ), 其中,q属于AL.

3.

再利用Mask 2从右向左,从下向上扫描,计算

F(p) = min( F(p), F(q)+D(p,q) ), 其中,q属于BR

4.

F(p) 则为距离变换后的图像。

代码实现距离变换算法

  • 头文件
#pragma once

// Copyright https://mangoroom.cn
// License(MIT)
// Author:mango
// distance transfer | 距离变换
// this is distance_transform.h

#include<opencv2/opencv.hpp>


namespace imageprocess
{
    // Distance transform function:距离变换函数
    void DistanceTransform(const cv::Mat& src_image, cv::Mat& dst_image);

    // Calculate City block distance: 计算城市街区距离
    int D4(const int& x1, const int& x2, const int& y1, const int& y2);

    // Calculate chessboard distance:计算棋盘距离
    int D8(const int& x1, const int& x2, const int& y1, const int& y2);

}//namespace imageproccess
  • 源文件


// Copyright https://mangoroom.cn
// License(MIT)
// Author:mango
// distance transfer | 距离变换
// this is distance_transform.cpp

#include"distance_transfer.h"
#include<array>

void imageprocess::DistanceTransform(const cv::Mat& src_image, cv::Mat& dst_image)
{
    //step1: check the input parameters: 检查输入参数
    assert(!src_image.empty());
    assert(src_image.channels() == 1);

    //step2: initialize dst_image : 初始化目标图像
    cv::threshold(src_image, dst_image, 100, 255, cv::THRESH_BINARY);


    //step3: pass throuth from top to bottom, left to right: 从上到下,从做到右遍历
    for (size_t i = 1; i < dst_image.rows - 1; i++)
    {
        for (size_t j = 1; j < dst_image.cols; j++)
        {
            //AL  AL    
            //AL  P
            //AL
            std::array<cv::Point, 4> AL;
            AL.at(0) =  cv::Point( i - 1, j - 1 );
            AL.at(1) =  cv::Point( i - 1, j );
            AL.at(2) =  cv::Point( i, j - 1 );
            AL.at(3) =  cv::Point(i + 1, j - 1 );

            int Fp = dst_image.at<uchar>(i, j);

            //Fq
            std::array<int, 4> Fq = { 0 };
            Fq.at(0) = dst_image.at<uchar>(i - 1, j - 1);
            Fq.at(1) = dst_image.at<uchar>(i - 1, j);
            Fq.at(2) = dst_image.at<uchar>(i, j - 1);
            Fq.at(3) = dst_image.at<uchar>(i + 1, j - 1);

            std::array<int, 4> Dpq = { 0 };
            std::array<int, 4> DpqAddFq = { 0 };
        
            for (size_t k = 0; k < 4; k++)
            {
                //D(p, q)
                Dpq.at(k) = D4(i, AL.at(k).x, j, AL.at(k).y);
                //D(p,q) + F(q)
                DpqAddFq.at(k) = Dpq.at(k) + Fq.at(k);
            }
            //F(p) = min[F(p), D(p,q) + F(q)]
            std::sort(DpqAddFq.begin(), DpqAddFq.end());
            
            auto min = DpqAddFq.at(0);
            Fp = std::min(Fp, min);

            dst_image.at<uchar>(i, j) = Fp;

        }
    }

    
    //step4: pass throuth from bottom to top, right to left: 从下到上,从右到左遍历

    for (int i = dst_image.rows - 2; i > 0; i--)
    {
        for (int j = dst_image.cols -  2; j >= 0 ; j--)
        {
            //        BR
            //  P   BR
            //  BR  BR
            std::array<cv::Point, 4> BR;
            BR.at(0) = cv::Point( i - 1, j + 1 );
            BR.at(1) = cv::Point( i , j + 1 );
            BR.at(2) = cv::Point( i + 1, j + 1 );
            BR.at(3) = cv::Point( i + 1, j );

            int Fp = dst_image.at<uchar>(i, j);

            //Fq
            std::array<int, 4> Fq = { 0 };
            Fq.at(0) = dst_image.at<uchar>(i - 1, j + 1);
            Fq.at(1) = dst_image.at<uchar>(i, j + 1);
            Fq.at(2) = dst_image.at<uchar>(i + 1, j + 1);
            Fq.at(3) = dst_image.at<uchar>(i + 1, j);

            std::array<int, 4> Dpq = { 0 };
            std::array<int, 4> DpqAddFq = { 0 };

            for (size_t k = 0; k < 4; k++)
            {
                //D(p, q)
                Dpq.at(k) = D4(i, BR.at(k).x, j, BR.at(k).y);
                //D(p,q) + F(q)
                DpqAddFq.at(k) = Dpq.at(k) + Fq.at(k);
            }

            //F(p) = min[F(p), D(p,q) + F(q)]
            std::sort(DpqAddFq.begin(), DpqAddFq.end());

            auto min = DpqAddFq.at(0);
            Fp = std::min(Fp, min);

            dst_image.at<uchar>(i, j) = static_cast<uchar>(Fp);

        }
    }

    
}


int imageprocess::D4(const int& x1, const int& x2, const int& y1, const int& y2)
{
    return abs(x1 - x2) + abs(y1 - y2);
}

int imageprocess::D8(const int& x1, const int& x2, const int& y1, const int& y2)
{
    return cv::max(abs(x1 - x2), (y1 - y2));
}


  • 测试
// Copyright https://mangoroom.cn
// License(MIT)
// Author:mango
// image proccess algorithm  | 图像处理算法
// this is main.cpp

#include"distance_transfer.h"


int main()
{
    cv::Mat src = cv::Mat::zeros(cv::Size(600, 400), CV_8UC1);

    for (size_t i = 100; i < 180; i++)
    {
        for (size_t j = 200; j < 400; j++)
        {
            src.at<uchar>(i, j) = 255;
        }
    }

    
    cv::Mat dst = src.clone();
    imageprocess::DistanceTransform(src, dst);
    normalize(dst, dst, 0, 255, cv::NORM_MINMAX);
    
    // opencv 
    /*cv::threshold(src, src, 100, 255, cv::THRESH_BINARY);
    cv::distanceTransform(src, dst, cv::DIST_L1, cv::DIST_MASK_PRECISE);
    normalize(dst, dst, 0, 1, cv::NORM_MINMAX);*/


    cv::imshow("src", src);
    cv::imshow("dst", dst);

    cv::imwrite("dst.jpg", dst);
    cv::waitKey(0);

    return 0;
}


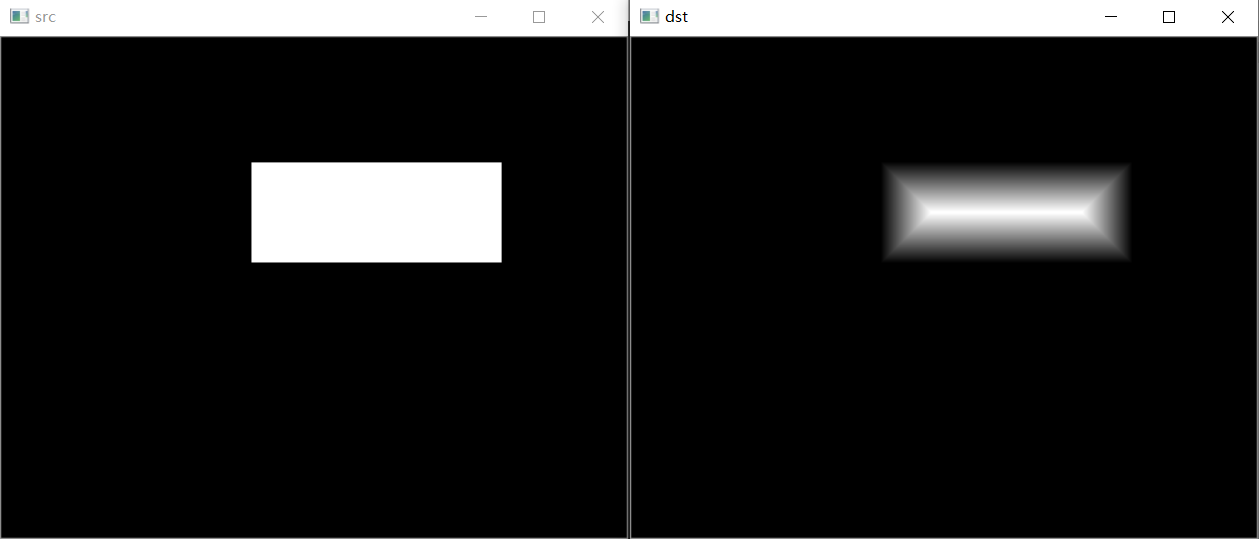
执行结果

运行代码结果.png


本文由芒果浩明发布,转载请注明来源。
本文链接:https://mangoroom.cn/opencv/distance-transfer.html


 继续浏览关于 图像处理计算机视觉图像处理算法距离变换 的文章

 本文最后更新于:2019/10/13 16:09:27,可能因经年累月而与现状有所差异

 引用转载请注明:芒果的博客 > opencv,算法,计算机视觉 > 距离变换